This tutorial will show you how to use a couple of layer styles, textures, and brush settings to create a bright, galaxy-inspired text effect. Let's get started!
Create a new 960 x 720 px document. Click the Create new fill or adjustment layer icon at the bottom of the Layerspanel, choose Solid Color, and use theColor#0c0e22.
Step 2
Go to File > Place Linked to open theCosmos image. Resize it as needed, and rename its layer to Background Image.
Step 3
Add a Hue/Saturation adjustment layer and change its Blend Mode to Color.
Change the Hue value to 23, and theSaturation to -45.
2. How to Create Text Layers
Step 1
Create the text in All Caps using the fontBungee. Set the Size to 230 pt, and if you use more than one line of text, change the Leading value to 210.
Step 2
Change the text layer's Fill value to 0.
Step 3
Duplicate the text layer twice.
3. How to Style the First Text Layer
Double-click the original text layer to apply the following layer style:
Step 1
Add a Bevel and Emboss with these settings:
Size: 20
Check the Anti-aliased box
Shadow Mode: Color Dodge
Color: #47fcc7
Opacity: 70%
Step 2
Add a Contour with these settings:
Contour: Rolling Slope - Descending
Check the Anti-aliased box.
Step 3
Add a Stroke with these settings:
Size: 1
Fill Type: Gradient
Use the faucet 30 gradient fill
Step 4
Add a Drop Shadow with these settings:
Opacity: 100%
Distance: 5
Spread: 30
Size: 10
This will style the first text layer.
4. How to Style the Second Text Layer
Double-click the first copy text layer to apply the following layer style:
Step 1
Add a Bevel and Emboss with these settings:
Size: 35
Uncheck the Use Global Light box
Angle: 107
Altitude: 37
Gloss Contour: Ring - Double
Check the Anti-aliased box
Highlight Mode:
Color: #ef1d58
Opacity: 70%
Shadow Mode: Color Dodge
Color: #a81227
Opacity: 70%
Step 2
Add a Contour with these settings:
Contour: Cone - Inverted
Check the Anti-aliased box.
Step 3
Add an Inner Shadow with these settings:
Blend Mode: Screen
Color: #b2b412
Opacity: 50%
Uncheck the Use Global Light box
Angle: 90
Distance: 25
Size: 30
Step 4
Add an Inner Glow with these settings:
Blend Mode: Lighter Color
Opacity: 25%
Gradient: Create the gradient fill using the Colors#4c1061 to the left,#3e2b6a in the middle, and #504b71 to the right.
Size: 18
This will style the second text layer.
5. How to Style the Third Text Layer
Double-click the second copy text layer to apply the following layer style:
Step 1
Add a Bevel and Emboss with these settings:
Size: 55
Uncheck the Use Global Light box
Angle: -39
Altitude: 58
Gloss Contour: Ring
Check the Anti-aliased box
Highlight Mode: Overlay
Color: #e3dc26
Shadow Mode: Color Dodge
Color: #0eb483
Opacity: 70%
Step 2
Add a Contour with these settings:
Contour: Rolling Slope - Descending
Check the Anti-aliased box.
Step 3
Add an Inner Shadow with these settings:
Blend Mode: Color Dodge
Color: #ab60f1
Opacity: 35%
Distance: 10
Size: 20
Step 4
Add an Inner Glow with these settings:
Opacity: 35%
Color: #ff1d48
Source: Center
Size: 65
Contour: Cone - Inverted
Step 5
Add a Satin effect with these settings:
Blend Mode: Color Dodge
Color: #ae8010
Opacity: 10%
Angle: 90
Distance: 143
Size: 95
Contour: Ring - Double
Check the Anti-aliased box
Check the Invert box
Step 6
Add an Outer Glow with these settings:
Blend Mode: Linear Dodge (Add)
Opacity: 25%
Color: #53abde
Size: 25
This will style the final text layer.
6. How to Stroke a Work Path
Step 1
Right-click any text layer and chooseCreate Work Path.
Pick the Brush Tool and open the Brushpanel (Window > Brush). It is important to do all the work inside the Brush panel, especially choosing the tips.
Step 2
Pick a soft round tip, and use these settings under the Brush Tip Shape andShape Dynamics tabs:
Step 3
Create a new layer on top of all layers, call it Fade Stroke, and set the Foreground Color to #29ecee.
Hit the Return key once to stroke the work path. If you want a different result, you can change the Size of the tip, or theFade value under the Shape Dynamicstab.
Step 4
Change the Fade Stroke layer's Blend Mode to Overlay.
7. How to Create a Texture Stroke Layer and Brush Tip
Step 1
Place the Stars texture on top of all layers, resize it as needed, rename its layer to Texture Stroke, and change itsBlend Mode to Linear Dodge (Add).
Step 2
Option-click the Add layer mask icon at the bottom of the Layers panel to add an inverted mask that hides the layer's contents.
Step 3
With the Brush Tool active, pick the Flat Angle 32px tip, and use these settings for the Brush Tip Shape and Shape Dynamics tabs:
8. How to Stroke a Work Path on a Layer Mask
Step 1
Select the Texture Stroke layer's thumbnail, set the Foreground Color toWhite, and pick the Direct Selection Tool (A).
Right-click the work path and chooseStroke Path. Set the Tool to Brush, check the Simulate Pressure box, and click OK.
We will repeat this step to stroke the rest of the textures in this tutorial, but with theSimulate Pressure box unchecked.
Step 2
Command-click any text layer's thumbnail to create a selection.
Step 3
Make sure that the Texture Stroke layer's thumbnail is still selected and that theBackground Color is Black, and pressCommand-Backspace to fill the selection with Black.
Press Command-D to deselect.
9. How to Create a Stroke Texture Group
Step 1
Place the Galaxy image below theoriginal text layer, resize it as needed, and rename its layer to BG Stroke 1.
Step 2
Add an inverted mask to the BG Stroke 1layer, and then place the layer in a group and call it BG Stroke.
Step 3
Duplicate the BG Stroke 1 layer threetimes, and rename the copies to add the numbers 2, 3, and 4.
10. How to Create Big Particles Brush Tips
Step 1
Pick the Brush Tool, choose the Erodible Point 9px tip, and use these settings:
Brush Tip Shape
Shape Dynamics
Scattering
Step 2
Select the BG Stroke 2 layer mask's thumbnail, and stroke the path using theDirect Selection Tool.
Make sure to uncheck the Simulate Pressure box for all the BG Stroke layers.
Step 3
Change the settings of the same brush tip to get a different outcome, by unchecking the Shape Dynamics tab, and using these settings for the Brush Tip Shape and Scattering:
Step 4
Use the modified tip to stroke the path on the BG Stroke 2 layer mask, and change the layer's Blend Mode to Lighter Color.
11. How to Create Dust Brush Tips
Step 1
Choose the Airbrush tip below, and use these Brush Tip Shape and Scatteringsettings:
Step 2
Click the Create new brush icon in the bottom right corner of the Brush panel, set the Name to Dust Brush, and click OK.
Step 3
Select the BG Stroke 3 layer mask's thumbnail, stroke the work path with theDust Brush tip, and change the layer'sBlend Mode to Color Dodge.
Step 4
Change the Brush Tip Shape andScattering settings of the same brush tip as below:
Step 5
Stroke the work path on the BG Stroke 4layer's thumbnail, and change the layer'sBlend Mode to Color Dodge.
With the Direct Selection Tool active, hit the Return key to get rid of the work path.
12. How to Add Light Streaks
Step 1
Place one of the P-Series.Black-BG - C4D Set images on top of theTexture Stroke layer, resize it as needed, and change its layer's Blend Mode toScreen.
Step 2
Press Command-T to enter the Free Transform Mode, and click the Warp icon in the Options bar.
Click-drag the points and/or the sections to warp the light into a shape you like. When you're done, hit the Return key to accept the changes.
You can also resize, rotate, and adjust the image while in the Free Transform Mode.
Step 3
You can add a layer mask, and use a soft round brush tip, with the Foreground Color set to Black, to paint over any unwanted areas and hide them.
Step 4
Add more images and warp them.
If the light's background is visible, you can go to Image > Adjustments > Levels, click the Sample in image to set black point icon, and click the background area you want to make black.
Step 5
Add as many images as needed, and place them anywhere you like.
13. How to Adjust a Background and the Global Coloring
Step 1
Add a layer mask to the Background Image layer, pick the Brush Tool, choose the Dust Brush you saved earlier, andclick-drag slightly in the center of the document to erase a part of the image's center.
Step 2
Add a Gradient Map on top of all layers, check the Dither box, and create the gradient fill using the Colors#5c3d69 to the left, #94516a in the middle, and#e8977a to the left.
Change the Gradient Map layer's Blend Mode to Soft Light, and its Opacity to30%.
Step 3
Add a Color Lookup adjustment layer on top of all layers, and use theFoggyNight.3DL table from the 3DLUT File menu.
Step 4
Press Command-A to select all, go to Edit > Copy Merged, and Edit > Paste Special > Paste in Place.
Rename the pasted layer to Overlay, and hide the Color Lookup layer.
Step 5
Decrease the Overlay layer's Opacity to a value you like.
Congratulations! You're Done
In this tutorial, we used a simple texture for the background, and created a couple of text layers. Then, we styled the text layers to create the main effect.
After that, we used textures and brush settings to create a couple of stroke layers. Finally, we used adjustment layers to enhance the final result.
Please feel free to leave your comments, suggestions, and outcomes below.
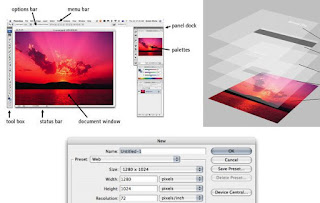
It doesn’t matter if you are new to the world of graphic design, or you are a photographer and you want to enhance your photos, you will eventually encounter the need to use Adobe Photoshop. Remembering when I first started out, I recall how intimidated I was at all of the menus and features available. I wondered how I would ever begin to know how to work my way through Photoshop and create professional quality, eye-dazzling work. Years later, I use Photoshop on a daily basis, and my actions are more like reflexes and I can complete most tasks without a second thought. I won’t lie to you. You won’t be able to go from getting started, to pro overnight, but you can take comfort in knowing that everyone has to start somewhere. Getting to Know Your Way Around Photoshop It is good to have a general idea of where everything is, so that you can work your way around the Photoshop interface. To get started, I will list some terminology, and where you can find it in Photoshop. 1. Mai...


 Step 5

0 Comments